How to Change control center old to new in Redmi 14C | ROOT MAGISK MODULE


✅ How to Enable New Control Center on Redmi 14C with HyperOS Using Magisk Module

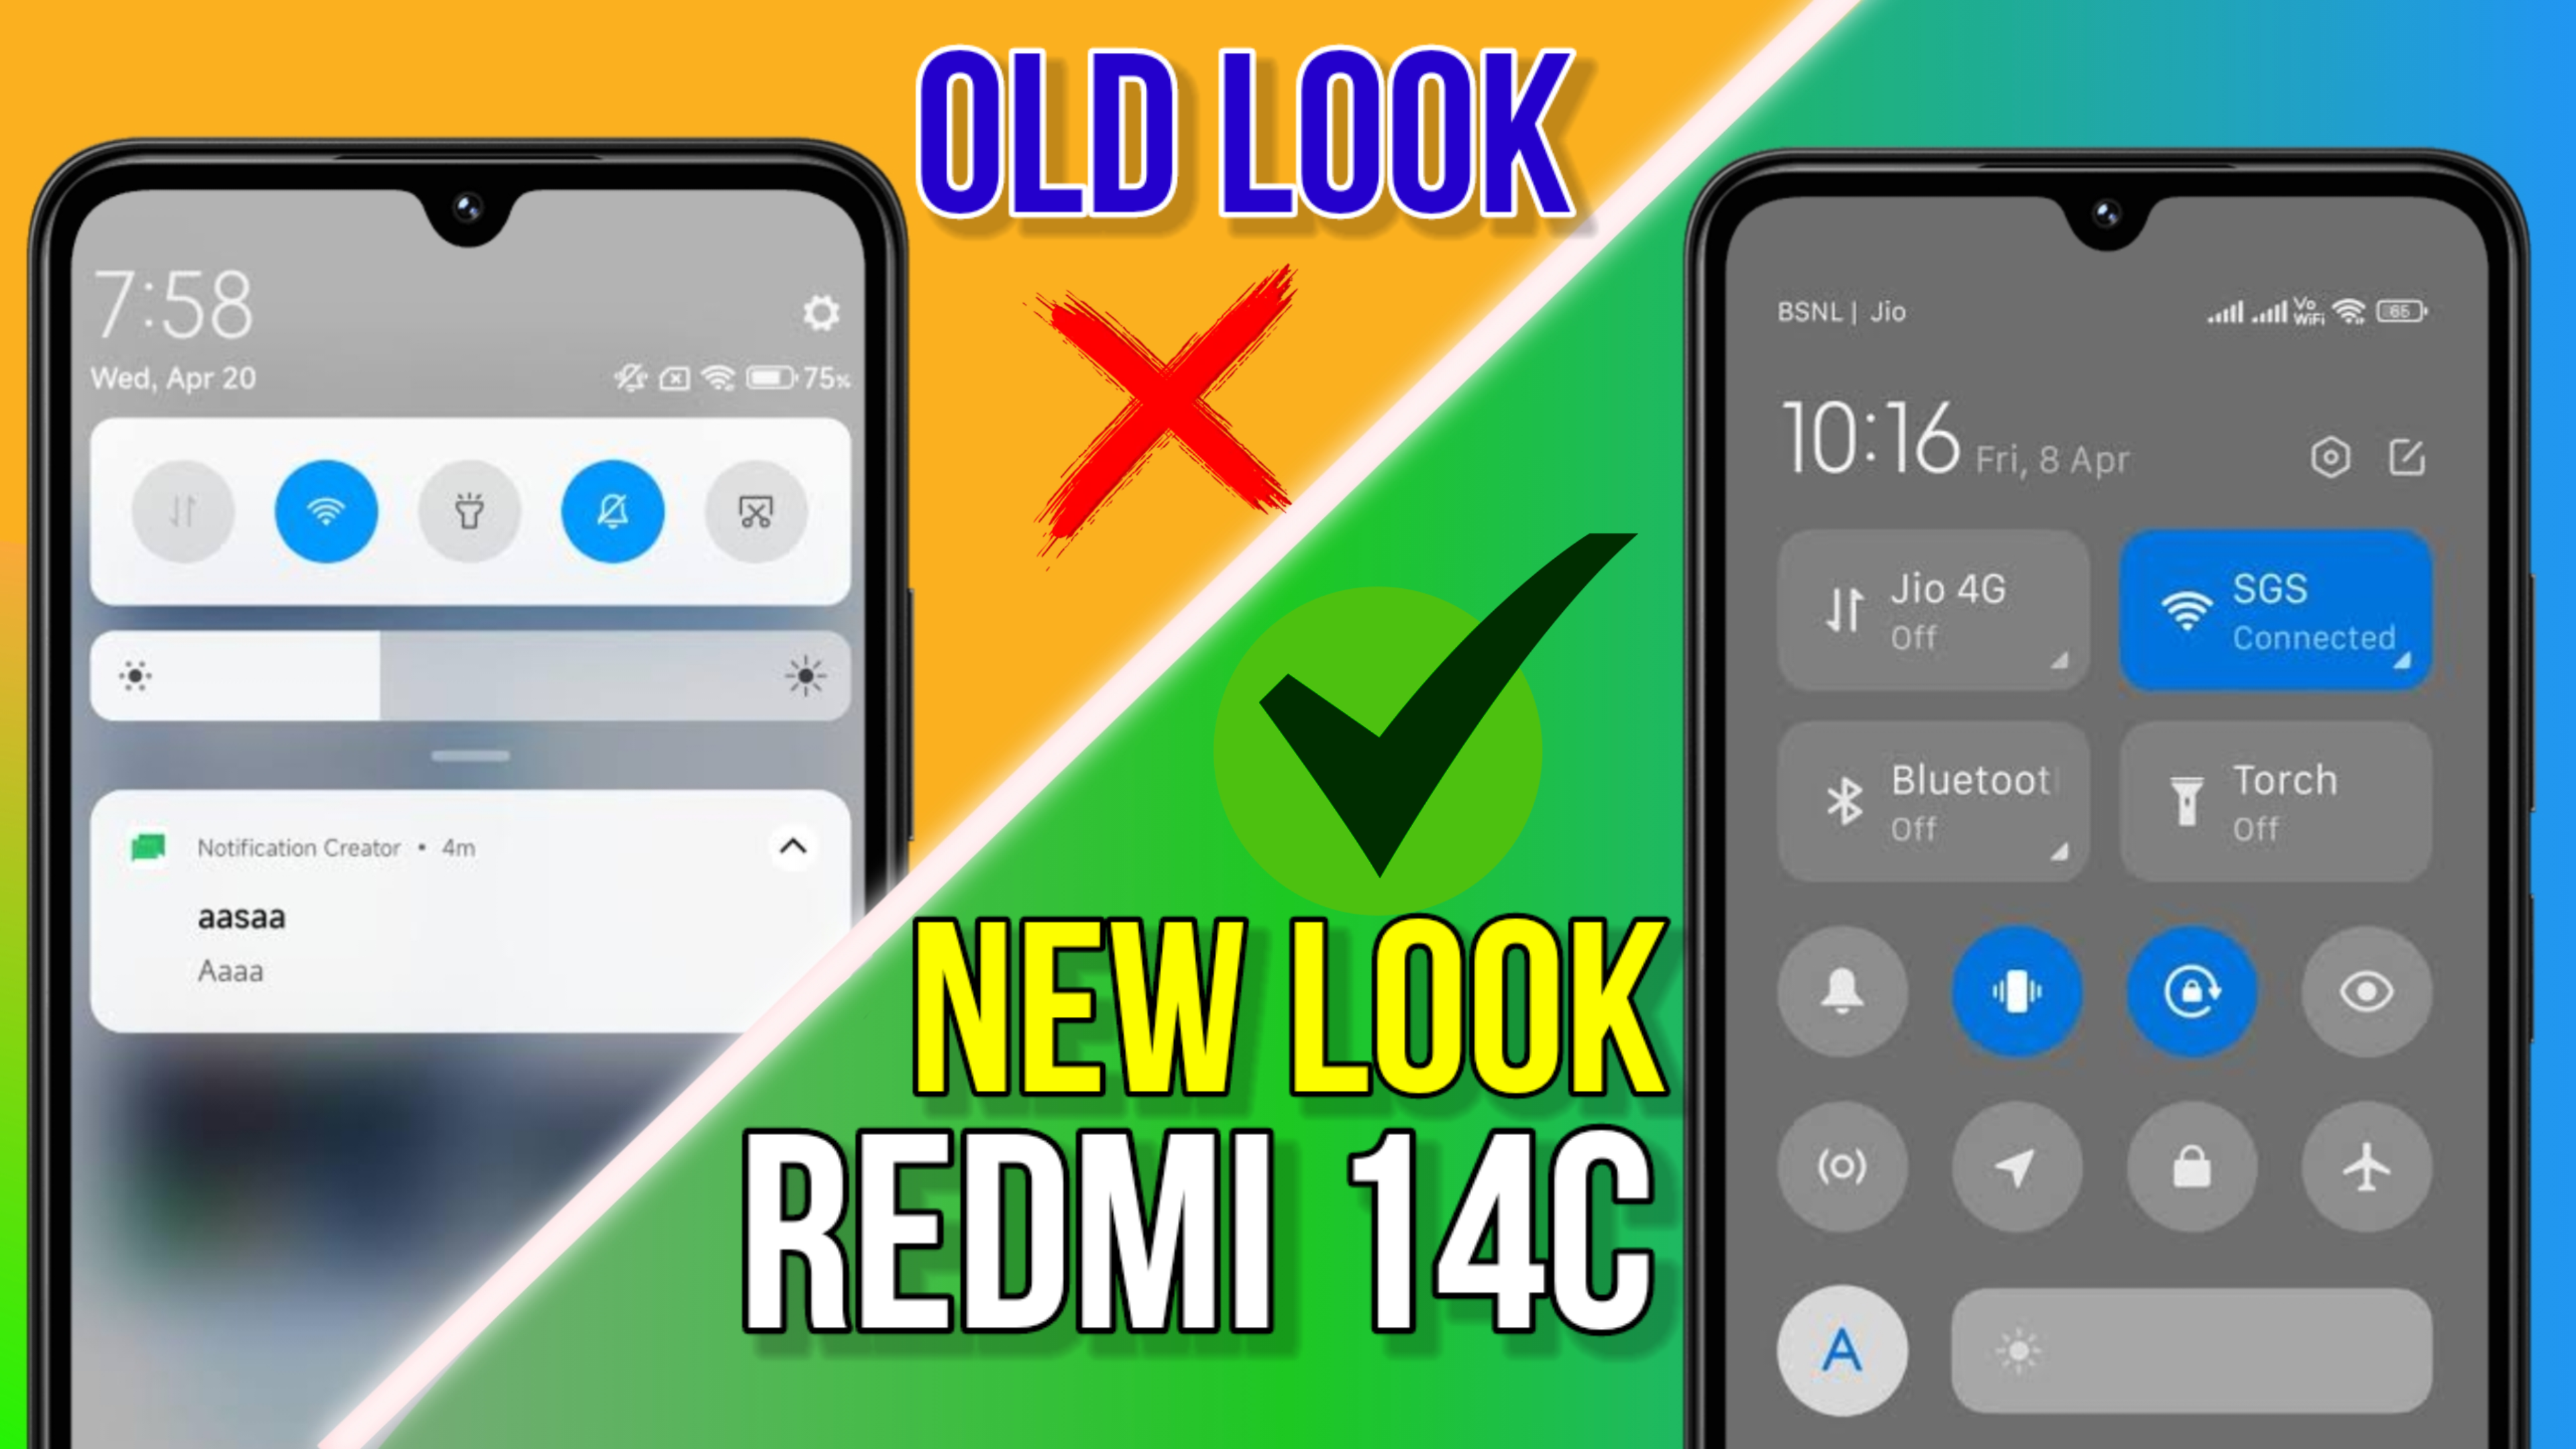
Redmi 14C is one of the budget Xiaomi devices running on HyperOS or HyperOS Lite. While the system is smooth and power-efficient, many users are disappointed to see the old Control Center UI instead of the new HyperOS-style Control Center with the iOS-like quick toggles.

In this post, you’ll learn how to change the old control panel to the new Control Center on  Redmi 14C running HyperOS, using a Magisk Module (for rooted phones).


📌 Why Is Control Center Old in HyperOS on Redmi 14C?

Here’s why you still see the old-style Control Center:

Reason Description
HyperOS Lite Devices like Redmi 14C use a lightweight version of HyperOS that hides some features.
Low-end Hardware New Control Center is disabled on budget devices to save performance and battery.
Hidden Settings Xiaomi disables the toggle for “Control Center Style” on some regional firmware.
No Root Access Without Magisk/root, you can't force-enable the new UI.

🧰 What You Need

To apply this tweak successfully, you need:

  • Rooted Redmi 14C
  • Magisk Installed
  • HyperOS or HyperOS Lite
  • ✅ Working Internet
  • ✅ Magisk Module: HyperOS Control Center Enabler

🔗 Download the Magisk Module

Module Name: MIUI New Control Center Enabler
Version: HyperOS Compatible
Size: ~31MB

Download Here


🚀 Installation Guide: Step by Step 

Step 1: Install the Module in Magisk

  1. Open the Magisk app on your phone.
  2. Go to the Modules tab.
  3. Tap “Install from Storage”.
  4. Select the downloaded Control Center Enabler.zip.
  5. Wait for installation to finish.
  6. Tap Reboot.

Step 2: Change Region (Optional)

In some cases, Xiaomi disables features in certain regions.

  1. Go to Settings > Additional Settings > Region
  2. Select India or Indonesia
  3. Reboot your phone

Step 3: Enable the New Control Center

After reboot:

  1. Go to Settings > Notifications & Control Center
  2. You will now see “Control Center Style”
  3. Tap it and choose New Version

Step 4: Use Activity Launcher (If the Setting Is Still Hidden)

If you don’t see the new toggle:

  1. Download Activity Launcher from the Play Store
  2. Search this activity:
    com.miui.notification.settings.NotificationSettingsActivity
  3. Tap to open
  4. Scroll down to Control Center Style
  5. Choose New Version

🛠 Known Issues on HyperOS Lite

Issue Solution
Toggle Panel not responsive Reboot again, or change theme
Option disappears on restart Reflash the module or try different theme
Animations laggy Disable animations from Developer Options

🔄 How to Uninstall the Module

  1. Open Magisk
  2. Go to Modules
  3. Tap the trash icon next to the Control Center Enabler
  4. Reboot your phone

✅ Conclusion

Even on HyperOS Lite devices like Redmi 14C, it is possible to enable the modern MIUI Control Center using Magisk modules. It gives your device a premium look, smooth toggles, and iOS-style separation of toggles and notifications.

If you’re already rooted, this is a simple and safe way to improve your UI without flashing a custom ROM.

How to change control center in Redmi 14C without ROOT


How to Change Old Control Center to New Control Center in Redmi 14C [Full Guide]


The Redmi 14C, running MIUI based on Android, offers great performance at an affordable price. However, one of the most noticeable differences users face is the Control Center UI style. If you're seeing the old MIUI-style toggle panel and want the modern, iOS-inspired new Control Center, you're in the right place.

In this article, I’ll guide you step by step on how to switch from the old Control Center to the new one on your Redmi 14C. This method is safe, requires no root access, and works even if you don’t have developer options enabled.


🔄 What Is the Difference Between the Old and New Control Center?

Feature Old Control Center New Control Center
Toggle Style Simple Grid Modern Icons with Rounded Cards
Notification & Toggles Combined in One Panel Separated: Swipe Left for Notifications, Right for Toggles
Aesthetic Classic Android Look Inspired by iOS Design
Brightness Control Basic Slider Smooth Animated Slider
Shortcut Layout Static Icons Dynamic, Animated Layout

The new Control Center not only looks more modern but also offers faster access to frequently used settings.


🧩 Why Is My Redmi 14C Still Showing the Old Control Center?

There are a few possible reasons:

  1. MIUI Version: The feature depends on your MIUI version.
  2. Region Settings: Some regions have this feature disabled by default.
  3. System UI Config: Hidden flags may prevent the new Control Center from appearing.
  4. Theme Conflict: Some custom themes override the Control Center UI.

✅ How to Enable New Control Center in Redmi 14C (No Root)

Here is the step-by-step guide:

Step 1: Check Your MIUI Version

  • Go to Settings > About phone.
  • Ensure you're using MIUI 13 or higher. Redmi 14C usually ships with MIUI 14/HyperOS Lite.

If your MIUI version is lower than 13, update your device first.


Step 2: Change Region to India (Optional but Helpful)

Some features are enabled by default in certain regions.

  1. Go to Settings > Additional settings > Region.
  2. Select India or Indonesia.
  3. Restart your phone.

Step 3: Enable New Control Center

  1. Open Settings.
  2. Tap on Notifications & Control Center.
  3. Tap on Control Center style.
  4. Select New version.

If you don’t see this option, follow the steps in the Fix section below.


🛠️ What to Do If “Control Center Style” Option Is Missing?

In some devices like Redmi 14C, this setting is hidden. Try the following methods:

Method 1: Use Activity Launcher App

  1. Download Activity Launcher from Play Store.
  2. Open the app and search:
    com.miui.notification.settings.NotificationSettingsActivity
  3. Tap to open this activity.
  4. Scroll down to Control Center Style and enable New Version.

Method 2: Install a Custom MIUI Theme

Some themes enable the new Control Center by default:

  • Search on Themes App: "iOS Control Center" or "MIUI 13 Style".
  • Apply the theme and reboot your device.

Make sure you select "Don't apply icons/wallpaper" if you only want the control panel style.


⚠️ Warnings and Notes

  • Changing regions may affect content recommendations and pre-installed apps.
  • If you want to switch back, simply reverse the steps.
  • If you face lag or UI glitches, reboot the phone or clear launcher cache.

🧽 Extra Tip: Clear System UI Cache (Optional)

Sometimes MIUI needs a reset to reflect the new UI:

  1. Go to Settings > Apps > Manage Apps.
  2. Search for System UI.
  3. Tap Clear Cache.

🧾 Conclusion

Changing the old Control Center to the new style in Redmi 14C can greatly enhance your user experience. With just a few tweaks — either by changing region, using Activity Launcher, or applying a theme — you can enjoy the sleek and modern look that comes with newer MIUI designs.

If you found this guide helpful, don’t forget to bookmark and share it! For more tips and tricks on MIUI and Xiaomi phones, stay connected with our blog.


Install Android 16 Custom ROM in POCO X3

 Android 16 is the latest version of Google's mobile operating system, building upon Android 15 with new features and improvements. It includes enhanced camera capabilities, improved security and privacy features, usability enhancements, and better support for large screens and foldables. The first developer preview was released in November 2024, with the first beta following in January 2025, and the final version released on June 10, 2025. 

So in this guide i will tell you how you can flash AOSP Android 16 Custom ROM for POCO X3 surya/karna devices. So let's get started.

AOSP Android 16

Device: POCO X3 (Surya/Karna)

Developer: @braindead

Version: Android 16

Notes: 

• GApps included.

Read the developer notice and check if any there additional information from builder.

Disclaimer

Your warranty is now void. I'm not responsible for bricking or any damage while installing this custom rom in your POCO X3. Use at your own risk.

Download AOSP Android 16 For POCO X3

You must have a custom recovery like TWRP in your POCO X3. If you don't have read this How to Install TWRP Recovery in POCO X3

Download AOSP Android 16 custom rom from HERE

Download GApps Android 16 Here (if necessary )

Download Magisk: Magisk.apk or latest and rename it with Magisk.zip (optionl)

Copy ROM to SdCard (Recommended) 

Install Instruction AOSP Android 16 in POCO X3

Enter TWRP or any recovery, for this purpose turn off your mobile now press and hold Volume Up and Power Button together, when see mobile logo release buttons.

First important step is make a backup of your current rom ( If you really need your data then backup if not then go to next step its all up to you.

Seletct Install - Select AOSP 16 rom and swipe to right to confirm flash.

Select Wipe - Format Data - type Yes in passowrd and swipe to confirm flash

Select Reboot - System 

Now setup the phone

How to Install GAPPS ( If Necessary ) 

Enter TWRP recovery mode for this purpose Power off your mobile and press and hold Volume Up and Power Button together for some seconds, when see mobile logo release buttons.

Select Install - Select GAPPS swipe right to confirm flash.

Select Reboot - System

How to Root ( If Necessary )

Enter TWRP Recovery mode press and hold Volume Up and Power button together, when see mobile logo release buttons.

Install - Magisk.zip

Reboot - System

Connect mobile to internet

Open Magisk app and install it, Magisk will ask for additional setup let's do it and app will automatically reboot your mobile.

Rom Credit:

I'm not developer of this custom rom. All credit of this custom rom goes to original developer and testers.

CherishOS 5.3 Android 14 Custom ROM For POCO X3

 CherishOS is based on AOSP and inspired by Google Pixel. CherishOS has Pixel UI noodles so many features that you probably won't find in any other custom ROMs. All you can dream of and all you will ever need. Just flash this beautiful ROM and enjoy. So in this guide i will tell you how you can flash CherishOS Android 14 Custom ROM for POCO X3 surya/karna devices. So let's get started.


Cherish OS 5.3

Device: POCO X3 (Surya/Karna)
Developer: @Ardjlon
Version: Android 14
Update: 21-03-2024

Changelog

  • - Latest source changes
  • - Now support Kprofiles v6
  • - February security patch
  • - Some improvements and fixes

Notes: 
• GApps, Leica & Dolby included
Read the developer notice and check if any there additional information from builder.

Disclaimer

Your warranty is now void. I'm not responsible for bricking or any damage while installing this custom rom in your POCO X3. Use at your own risk.

Download CherishOS For POCO X3

  1. You must have a custom recovery like TWRP in your POCO X3. If you don't have read this How to Install TWRP Recovery in POCO X3
  2. Download CherishOS - Anroid 14 custom rom from HERE
  3. Download GApps Android 14 Here (if necessary )
  4. Download Magisk: Magisk.apk or latest and rename it with Magisk.zip (optionl)
  5. Copy ROM to SdCard (Recommended) 

Install Instruction CherishOS in POCO X3

  1. Enter TWRP or any recovery, for this purpose turn off your mobile now press and hold Volume Up and Power Button together, when see mobile logo release buttons.
  2. First important step is make a backup of your current rom ( If you really need your data then backup if not then go to next step its all up to you.
  3. Seletct Install - Select CherishOS rom and swipe to right to confirm flash.
  4. Select Wipe - Format Data - type Yes in passowrd and swipe to confirm flash
  5. Select Reboot - System 
  6. Now setup the phone

How to Install GAPPS ( If Necessary ) 

  • Enter TWRP recovery mode for this purpose Power off your mobile and press and hold Volume Up and Power Button together for some seconds, when see mobile logo release buttons.
  • Select Install - Select GAPPS swipe right to confirm flash.
  • Select Reboot - System

How to Root ( If Necessary )

  • Enter TWRP Recovery mode press and hold Volume Up and Power button together, when see mobile logo release buttons.
  • Install - Magisk.zip
  • Reboot - System
  • Connect mobile to internet
  • Open Magisk app and install it, Magisk will ask for additional setup let's do it and app will automatically reboot your mobile
  • Done

Rom Credit:

I'm not developer of this custom rom. All credit of this custom rom goes to original developer and testers.

HorizonDroid 2.3.1 Interstellar 2.3.1 Official Android 14 For POCO X3

HorizonDroid is an AOSP and PIXEL OS based custom rom. It allows users to experience Google's latest pixel updates and useful features from known custom ROMs. It currently supports Android 14 with latest security patches from Google. In this post i will provide you download link of Horizondroid Rom for your POCO X3 and will tell you How to Install Horizondroid Custom ROM in your POCO X3. So let's get started.


HorizonDroid Interstellar 2.3.1 Official

Device: POCO X3 (Surya/Karna)
Developer: @HinohArata
Version: Android 14
Update: 18-03-2024

Changelog

  • • Revamped XiaomiParts
  • • Fixed Kprofiles (Kernel should support it or use this kernel)
  • • Included Dolby Atmos
  • • Fixed Refresh Rate Tiles
  • • Import apns-conf from AOSPA
  • • Updated Leica Camera to v5
  • • Previous build Changelog

Notes: 
• Included Gapps and Fw 
Read the developer notice and check if any there additional information from builder.

Disclaimer

Your warranty is now void. I'm not responsible for bricking or any damage while installing this custom rom in your POCO X3. Use at your own risk.

Download Horizondroid Official For POCO X3

  1. You must have a custom recovery like TWRP in your POCO X3. If you don't have read this How to Install TWRP Recovery in POCO X3
  2. Download Horizondroid Official - Anroid 14 custom rom from HERE
  3. Download GApps Android 14 Here (if necessary )
  4. Download Magisk: Magisk.apk or latest and rename it with Magisk.zip (optionl)
  5. Copy ROM to SdCard (Recommended) 

Install Instruction HorizonDroid Official in POCO X3

  1. Enter TWRP or any recovery, for this purpose turn off your mobile now press and hold Volume Up and Power Button together, when see mobile logo release buttons.
  2. First important step is make a backup of your current rom ( If you really need your data then backup if not then go to next step its all up to you.
  3. Seletct Install - Select HorizonDroid rom and swipe to right to confirm flash.
  4. Select Wipe - Format Data - type Yes in passowrd and swipe to confirm flash
  5. Select Reboot - System 
  6. Now setup the phone

How to Install GAPPS ( If Necessary ) 

  • Enter TWRP recovery mode for this purpose Power off your mobile and press and hold Volume Up and Power Button together for some seconds, when see mobile logo release buttons.
  • Select Install - Select GAPPS swipe right to confirm flash.
  • Select Reboot - System

How to Root ( If Necessary )

  • Enter TWRP Recovery mode press and hold Volume Up and Power button together, when see mobile logo release buttons.
  • Install - Magisk.zip
  • Reboot - System
  • Connect mobile to internet
  • Open Magisk app and install it, Magisk will ask for additional setup let's do it and app will automatically reboot your mobile
  • Done

Rom Credit:

I'm not developer of this custom rom. All credit of this custom rom goes to original developer and testers.

How to Remove Bloatware From Any Xiaomi, Redmi and POCO Mobile

 Xiaomi is one of largest and leading smartphone brand in the world. Xiaomi has very low price their smartphone's instead of other brands like Samsung, OPPO, Vivo etc. But there are some disadvantages of Xiaomi smartphone that there are lots of bloatware and ads in Xiaomi smartphone. In this guide i will tell you how you can remove bloatware from your Xiaomi, Redmi and POCO Mobiles. So let's get started.


What is Bloatware 

The term ‘Bloatware’ means apps that come pre-installed on the device, that take up more space, and are generally of no use to the user. For example, Opera, Facebook, Netflix, etc. Unless you root the device, which is a difficult task in itself, you cannot uninstall or disable the bloatware. Here, I will provide you a working method to remove bloatware which you can finally get rid of MIUI apps that feed off your RAM without going through the rooting process.

PREQUEISITE

Download Xiaomi ADB/Fastboot Tools
ADB installed on your PC(and its relative drivers if you're using Windows)
Java SDK installed on your PC
Device running MIUI (only tested on MIUI 12 and above)
USB debugging enabled on device

First of all Download and Install ADB and Fastboot Driver HERE
Now Install JAVA SDK Download HERE

How to turn on USB Debugging in Android

  • Go to "Settings" on the phone;
  • Tap "My device"
  • Find "All specs"
  • Tap MIUI version 7-10 times to make Developer options available. (You will see "You are now a developer!
  • Go back to the previous page and find "Additional settings";
  • Find the "Developer options";
  • Turn on "USB debugging";
  • Tap "OK".


Note: Xiaomi devices need to enable “USB debugging (Security settings

PS: You need to sign in to your Xiaomi account in settings, so you are allowed to enable “USB debugging (Security settings

Steps to Debloat

  • Turn on USB debugging
  • Connect your phone to the PC
  • Check the ADB is installed on the PC


  • Uninstall the bloatware by selecting the apps and clicking on the uninstall button However, you should not delete all of the apps listed below. Some apps are required for your phone to function, and removing them may result in your phone failing to boot into the Android operating system (if this happens you need to wipe your phone to get it working again this means losing all your personal data).

Select the apps you’d like to remove and click the uninstall button at the bottom. You can reinstall apps with the “reinstaller” menu if you unintentionally delete an app you don’t want to delete.

Safe debloat list

  • Analytics
  • Android accessibility suite
  • app vault
  • browser
  • calendar
  • compass
  • Catchlog
  • digital wellbeing
  • downloads
  • fm radio
  • facebook
  • feedback
  • freeform
  • games
  • gmail
  • google app
  • google duo
  • google lens
  • joyose
  • msa
  • market feedback agent
  • mi credit
  • mi drop
  • mi pay
  • mi video
  • mi wallpaper
  • miui daemon
  • music
  • notes
  • PAI
  • Partner bookmarks
  • partner netflix activation
  • quick apps
  • quick ball
  • recorder
  • scanner
  • translation service
  • weather
  • WMService
  • yellow pages


EverestOS 1.0 Unofficial Android 14 Custom ROM For POCO X3

EverestOS is an AOSP based custom rom. In This Guide i will tell you how you can install EverestOS custom rom in your poco x3 nfc surya/karna devices. So let's get started.


EverestOS 1.0 Unofficial

Device: POCO X3 (Surya/Karna)
Developer: @HinohArata
Version: Android 14
Update: 16-03-2024

Changelog

  • • Initial build • Integrity passed by default • Revamped MemeParts • Leica cam included • More
Notes: 
• Included Gapps and Fw 
• Kprofiles will be fix next update
• Bugs = Features, tell me if u found
Read the developer notice and check if any there additional information from builder.

Disclaimer

Your warranty is now void. I'm not responsible for bricking or any damage while installing this custom rom in your POCO X3. Use at your own risk.

Download EverestOS Unofficial For POCO X3

  1. You must have a custom recovery like TWRP in your POCO X3. If you don't have read this How to Install TWRP Recovery in POCO X3
  2. Download EverestOS Unofficial - Anroid 14 custom rom from HERE
  3. Download GApps Android 14 Here (if necessary )
  4. Download Magisk: Magisk.apk or latest and rename it with Magisk.zip (optionl)
  5. Copy ROM to SdCard (Recommended) 

Install Instruction HorizonDroid Official in POCO X3

  1. Enter TWRP or any recovery, for this purpose turn off your mobile now press and hold Volume Up and Power Button together, when see mobile logo release buttons.
  2. First important step is make a backup of your current rom ( If you really need your data then backup if not then go to next step its all up to you.
  3. Seletct Install - Select EverestOS rom and swipe to right to confirm flash.
  4. Select Wipe - Format Data - type Yes in passowrd and swipe to confirm flash
  5. Select Reboot - System 
  6. Now setup the phone

How to Install GAPPS ( If Necessary ) 

  • Enter TWRP recovery mode for this purpose Power off your mobile and press and hold Volume Up and Power Button together for some seconds, when see mobile logo release buttons.
  • Select Install - Select GAPPS swipe right to confirm flash.
  • Select Reboot - System

How to Root ( If Necessary )

  • Enter TWRP Recovery mode press and hold Volume Up and Power button together, when see mobile logo release buttons.
  • Install - Magisk.zip
  • Reboot - System
  • Connect mobile to internet
  • Open Magisk app and install it, Magisk will ask for additional setup let's do it and app will automatically reboot your mobile
  • Done

Rom Credit:

I'm not developer of this custom rom. All credit of this custom rom goes to original developer and testers.

HorizonDroid 2.2 Official ROM For POCO X3

 HorizonDroid is an AOSP and PIXEL OS based custom rom. It allows users to experience Google's latest pixel updates and useful features from known custom ROMs. It currently supports Android 14 with latest security patches from Google. In this post i will provide you download link of Horizondroid Rom for your POCO X3 and will tell you How to Install Horizondroid Custom ROM in your POCO X3. So let's get started.


HorizonDroid 2.2 Official

Device: POCO X3 (Surya/Karna)
Developer: @HinohArata
Version: Android 14
Update: 07-03-2024

Changelog

  • Fixed Fingerprint missing
  • Fsociety based kernel
  • Leica supported (use this)
  • Revert "surya: Remove unImporant packages"
  • Previous build changelog (This)
Notes: 
• Included Gapps and Fw 
Read the developer notice and check if any there additional information from builder.

Disclaimer

Your warranty is now void. I'm not responsible for bricking or any damage while installing this custom rom in your POCO X3. Use at your own risk.

Download Horizondroid Official For POCO X3

  1. You must have a custom recovery like TWRP in your POCO X3. If you don't have read this How to Install TWRP Recovery in POCO X3
  2. Download Horizondroid Official - Anroid 14 custom rom from HERE
  3. Download GApps Android 14 Here (if necessary )
  4. Download Magisk: Magisk.apk or latest and rename it with Magisk.zip (optionl)
  5. Copy ROM to SdCard (Recommended) 

Install Instruction HorizonDroid Official in POCO X3

  1. Enter TWRP or any recovery, for this purpose turn off your mobile now press and hold Volume Up and Power Button together, when see mobile logo release buttons.
  2. First important step is make a backup of your current rom ( If you really need your data then backup if not then go to next step its all up to you.
  3. Seletct Install - Select HorizonDroid rom and swipe to right to confirm flash.
  4. Select Wipe - Format Data - type Yes in passowrd and swipe to confirm flash
  5. Select Reboot - System 
  6. Now setup the phone

How to Install GAPPS ( If Necessary ) 

  • Enter TWRP recovery mode for this purpose Power off your mobile and press and hold Volume Up and Power Button together for some seconds, when see mobile logo release buttons.
  • Select Install - Select GAPPS swipe right to confirm flash.
  • Select Reboot - System

How to Root ( If Necessary )

  • Enter TWRP Recovery mode press and hold Volume Up and Power button together, when see mobile logo release buttons.
  • Install - Magisk.zip
  • Reboot - System
  • Connect mobile to internet
  • Open Magisk app and install it, Magisk will ask for additional setup let's do it and app will automatically reboot your mobile
  • Done

Rom Credit:

I'm not developer of this custom rom. All credit of this custom rom goes to original developer and testers.

How to Install Xiaomi HyperOS in POCO X3

As you know HyperOS launched in all over world. Some devices getting HyperOS Update. POCO X3 NFC not officially supported HyperOS latest version. In this guide i will tell you how you can install HyperOS Port Rom in POCO X3 surya/karna devices. So let's get started. 


HyperOS 1.0.24.3.4 Global

Device: POCO X3 (Surya/Karna)
Developer: @KevinMirandaPasiche
Version: Android 14
Update: 04-03-2024

Changelog

  •  Base updated
  • Added some extra options
  • Fixed Swift Backup crash
  •  Fixed Bluetooth audio volume adjustment
  • Overall improvements
Notes:
  •   Use recommended recovery
  •   Ported from Diting (Xiaomi 12T Pro)

Disclaimer

Your warranty is now void. I'm not responsible for bricking or any damage while installing this custom rom in your POCO X3. Use at your own risk.

Download PixelOS Unofficial For POCO X3

  1. You must have a custom recovery like TWRP in your POCO X3. If you don't have read this How to Install TWRP Recovery in POCO X3
  2. Download HyperOS - Anroid 14 custom rom from HERE
  3. Download GApps Android 14 Here (if necessary )
  4. Download Magisk: Magisk.apk or latest and rename it with Magisk.zip (optionl)
  5. Copy ROM to SdCard (Recommended) 

Install Instruction PixelOS Unofficial in POCO X3

  1. Enter TWRP or any recovery, for this purpose turn off your mobile now press and hold Volume Up and Power Button together, when see mobile logo release buttons.
  2. First important step is make a backup of your current rom ( If you really need your data then backup if not then go to next step its all up to you.
  3. Seletct Install - Select HyperOS rom and swipe to right to confirm flash.
  4. Select Wipe - Format Data - type Yes in passowrd and swipe to confirm flash
  5. Select Reboot - System 
  6. Now setup the phone

How to Install GAPPS ( If Necessary ) 

  • Enter TWRP recovery mode for this purpose Power off your mobile and press and hold Volume Up and Power Button together for some seconds, when see mobile logo release buttons.
  • Select Install - Select GAPPS swipe right to confirm flash.
  • Select Reboot - System

How to Root ( If Necessary )

  • Enter TWRP Recovery mode press and hold Volume Up and Power button together, when see mobile logo release buttons.
  • Install - Magisk.zip
  • Reboot - System
  • Connect mobile to internet
  • Open Magisk app and install it, Magisk will ask for additional setup let's do it and app will automatically reboot your mobile
  • Done

Rom Credit:

I'm not developer of this custom rom. All credit of this custom rom goes to original developer and testers.

Evolution X 8.3 For POCO X3 Update

 Evolution X is a flashable custom rom to bring a true pixel experience feel to your android mobiles. It provide your many customizations and awesome features for your android devices. This rom provide you best Pixel Experience feel for your android devices with many features and best optimizations options for your mobile. In this post i will provide your Evolution X download link and tell you how you can install Evolution X Custom Rom for your POCO X3 Surya/Karna Mobile. So lets get started,


Evolution X Unofficial

Device: POCO X3 (Surya/Karna)
Developer: @Ardjlon
Version: Android 14
Update: 14-03-2024

Changelog

 Fix Offline Charging

Notes: 
• GApps, leica & dolby included
Read the developer notice and check if any there additional information from builder.

Disclaimer

Your warranty is now void. I'm not responsible for bricking or any damage while installing this custom rom in your POCO X3. Use at your own risk.

Download Evolution X Unofficial For POCO X3

  1. You must have a custom recovery like TWRP in your POCO X3. If you don't have read this How to Install TWRP Recovery in POCO X3
  2. Download Evolution X Unofficial - Anroid 14 custom rom from HERE
  3. Download GApps Android 14 Here (if necessary )
  4. Download Magisk: Magisk.apk or latest and rename it with Magisk.zip (optionl)
  5. Copy ROM to SdCard (Recommended) 

Install Instruction Evolution X Unofficial in POCO X3

  1. Enter TWRP or any recovery, for this purpose turn off your mobile now press and hold Volume Up and Power Button together, when see mobile logo release buttons.
  2. First important step is make a backup of your current rom ( If you really need your data then backup if not then go to next step its all up to you.
  3. Seletct Install - Select Evolution X Unofficial rom and swipe to right to confirm flash.
  4. Select Wipe - Format Data - type Yes in passowrd and swipe to confirm flash
  5. Select Reboot - System 
  6. Now setup the phone

How to Install GAPPS ( If Necessary ) 

  • Enter TWRP recovery mode for this purpose Power off your mobile and press and hold Volume Up and Power Button together for some seconds, when see mobile logo release buttons.
  • Select Install - Select GAPPS swipe right to confirm flash.
  • Select Reboot - System

How to Root ( If Necessary )

  • Enter TWRP Recovery mode press and hold Volume Up and Power button together, when see mobile logo release buttons.
  • Install - Magisk.zip
  • Reboot - System
  • Connect mobile to internet
  • Open Magisk app and install it, Magisk will ask for additional setup let's do it and app will automatically reboot your mobile
  • Done

Rom Credit:

I'm not developer of this custom rom. All credit of this custom rom goes to original developer and testers.

Superior Extended Official Android 14 For POCO X3 (Update)


SuperiorOS Extended Official 

Device: POCO X3 (Surya/Karna)
Developer: @muichir09
Version: Android 14
Update: 11-03-2024

Changelog

 • Initial OFFICIAL build
 • Firmware included 
 • Leica Cam included

Notes:
- Use provided recovery for flashing rom
- Use 4-5 hours to get stable
Read the developer notice and check if any there additional information from builder.

Disclaimer

Your warranty is now void. I'm not responsible for bricking or any damage while installing this custom rom in your POCO X3. Use at your own risk.

Download SuperiorOS Extended For POCO X3

  1. You must have a custom recovery like TWRP in your POCO X3. If you don't have read this How to Install TWRP Recovery in POCO X3
  2. Download SuperiorOS Extended - Anroid 14 custom rom from HERE
  3. Download GApps Android 14 Here (if necessary )
  4. Download Magisk: Magisk.apk or latest and rename it with Magisk.zip (optionl)
  5. Copy ROM to SdCard (Recommended) 

Install Instruction SuperiorOS Extended in POCO X3

  1. Enter TWRP or any recovery, for this purpose turn off your mobile now press and hold Volume Up and Power Button together, when see mobile logo release buttons.
  2. First important step is make a backup of your current rom ( If you really need your data then backup if not then go to next step its all up to you.
  3. Seletct Install - Select LegionOS rom and swipe to right to confirm flash.
  4. Select Wipe - Format Data - type Yes in passowrd and swipe to confirm flash
  5. Select Reboot - System 
  6. Now setup the phone

How to Install GAPPS ( If Necessary ) 

  • Enter TWRP recovery mode for this purpose Power off your mobile and press and hold Volume Up and Power Button together for some seconds, when see mobile logo release buttons.
  • Select Install - Select GAPPS swipe right to confirm flash.
  • Select Reboot - System

How to Root ( If Necessary )

  • Enter TWRP Recovery mode press and hold Volume Up and Power button together, when see mobile logo release buttons.
  • Install - Magisk.zip
  • Reboot - System
  • Connect mobile to internet
  • Open Magisk app and install it, Magisk will ask for additional setup let's do it and app will automatically reboot your mobile
  • Done

Rom Credit:

I'm not developer of this custom rom. All credit of this custom rom goes to original developer and testers.

Pixel Experince Android 14 Unofficial For POCO X3

Pixel Experience is an AOSP based rom with Google APPS include and all Pixel goodies. Pixel Experience Android 14 Officially not supported with POCO X3 Surya/Karna devices. In this post i will provide you Pixel Experience Android 14 Unofficial custom rom for POCO X3 Surya/Karna devices. How to install and flash Pixel Experience Android 14 for POCO X3 device see the details below.


Pixel Experience Unofficial

Device: POCO X3 (Surya/Karna)
Developer: @Muichir09
Version: Android 14
Update: 10-03-2024

Source Changelog

  • Initial Build for a14
  • For leica use #leica module
  • FW included
  • Remove spatial sound effects
  • Passed Integrity by default
  • Upstreamed KSU
  • Fix some logspams

Disclaimer

Your warranty is now void. I'm not responsible for bricking or any damage while installing this custom rom in your POCO X3. Use at your own risk.

Download PixelOS Unofficial For POCO X3

  1. You must have a custom recovery like TWRP in your POCO X3. If you don't have read this How to Install TWRP Recovery in POCO X3
  2. Download Pixel Experience Unofficial - Anroid 14 custom rom from HERE
  3. Download GApps Android 14 Here (if necessary )
  4. Download Magisk: Magisk.apk or latest and rename it with Magisk.zip (optionl)
  5. Copy ROM to SdCard (Recommended) 

Install Instruction PixelOS Unofficial in POCO X3

  1. Enter TWRP or any recovery, for this purpose turn off your mobile now press and hold Volume Up and Power Button together, when see mobile logo release buttons.
  2. First important step is make a backup of your current rom ( If you really need your data then backup if not then go to next step its all up to you.
  3. Seletct Install - Select Pixel Experience Unofficial rom and swipe to right to confirm flash.
  4. Select Wipe - Format Data - type Yes in passowrd and swipe to confirm flash
  5. Select Reboot - System 
  6. Now setup the phone

How to Install GAPPS ( If Necessary ) 

  • Enter TWRP recovery mode for this purpose Power off your mobile and press and hold Volume Up and Power Button together for some seconds, when see mobile logo release buttons.
  • Select Install - Select GAPPS swipe right to confirm flash.
  • Select Reboot - System

How to Root ( If Necessary )

  • Enter TWRP Recovery mode press and hold Volume Up and Power button together, when see mobile logo release buttons.
  • Install - Magisk.zip
  • Reboot - System
  • Connect mobile to internet
  • Open Magisk app and install it, Magisk will ask for additional setup let's do it and app will automatically reboot your mobile
  • Done

Rom Credit:

I'm not developer of this custom rom. All credit of this custom rom goes to original developer and testers.


HyperOS Port Rom Android 14 For POCO X3

 As you know HyperOS launched in all over world. Some devices getting HyperOS Update. POCO X3 NFC not officially supported HyperOS latest version. In this guide i will tell you how you can install HyperOS Port Rom in POCO X3 surya/karna devices. So let's get started. 


HyperOS 1.0.3.0 Global

Device: POCO X3 (Surya/Karna)
Developer: @Yar_Zloy
Version: Android 14
Update: 26-02-2024

Changelog

• The first build of HyperOS based on global.
• Dialer and SMS from MIUI
• Third-party themes are used
 • Install magisk as a normal apk
Multilanguage firmware

Notes:
 Clean installation only

Disclaimer

Your warranty is now void. I'm not responsible for bricking or any damage while installing this custom rom in your POCO X3. Use at your own risk.

Download PixelOS Unofficial For POCO X3

  1. You must have a custom recovery like TWRP in your POCO X3. If you don't have read this How to Install TWRP Recovery in POCO X3
  2. Download HyperOS - Anroid 14 custom rom from HERE
  3. Download GApps Android 14 Here (if necessary )
  4. Download Magisk: Magisk.apk or latest and rename it with Magisk.zip (optionl)
  5. Copy ROM to SdCard (Recommended) 

Install Instruction PixelOS Unofficial in POCO X3

  1. Enter TWRP or any recovery, for this purpose turn off your mobile now press and hold Volume Up and Power Button together, when see mobile logo release buttons.
  2. First important step is make a backup of your current rom ( If you really need your data then backup if not then go to next step its all up to you.
  3. Seletct Install - Select HyperOS rom and swipe to right to confirm flash.
  4. Select Wipe - Format Data - type Yes in passowrd and swipe to confirm flash
  5. Select Reboot - System 
  6. Now setup the phone

How to Install GAPPS ( If Necessary ) 

  • Enter TWRP recovery mode for this purpose Power off your mobile and press and hold Volume Up and Power Button together for some seconds, when see mobile logo release buttons.
  • Select Install - Select GAPPS swipe right to confirm flash.
  • Select Reboot - System

How to Root ( If Necessary )

  • Enter TWRP Recovery mode press and hold Volume Up and Power button together, when see mobile logo release buttons.
  • Install - Magisk.zip
  • Reboot - System
  • Connect mobile to internet
  • Open Magisk app and install it, Magisk will ask for additional setup let's do it and app will automatically reboot your mobile
  • Done

Rom Credit:

I'm not developer of this custom rom. All credit of this custom rom goes to original developer and testers.